

This post is also available in:
A well-thought-out email signature for Zoho Desk can help you build rapport with customers, credibility among customer service agents, and brand loyalty, which increases customer retention.
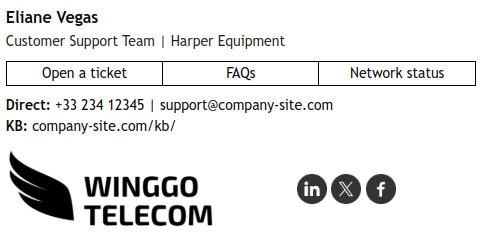
Email signature example for Zoho Desk:

Follow our best practices to take advantage of these benefits and create your next customer support email manually on Zoho Desk. Or, automate the process with powerful signature management software like Bybrand.
Understanding email signatures in Zoho Desk
An email signature is an essential part of an email. It’s the block of text or HTML at the footer of your email, which acts as your signifier and calling card.
The signature section can include a lot of information, including your name, job title, company name, contact details, and any other relevant information.
With helpdesk software like Zoho Desk, you can use helpdesk templates to create a signature section for every department and new ticket.
Why is an email signature important?
Besides providing essential contact details for customers, email signatures serve a range of purposes, including:
- Reinforcing your company’s branding through consistent design
- Adding professionalism to customer interactions
- Directing customers to important links like FAQs, live chat, or support resources
- Personalizing support emails with agents’ names and roles
Best practices for help desk email signatures
An effective email signature in Zoho Desk doesn’t happen accidentally. It takes strategy to make the most of your signature section.
Based on our expertise, these best practices are key to creating an effective email signature that keeps branding consistent and provides actionable instructions for further communication with customers.
Keep the email signature simple
Readability is crucial when sending emails. A cluttered email overwhelms readers and keeps them from seeing the most relevant information, which is especially important when handling customer service queries.
So, create a simple and professional customer service email signature. Avoid using too many colors, too many different fonts, and long text blocks. Keep the signature section concise and to the point.
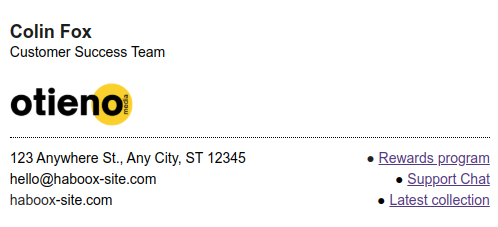
Example of a simple HTML signature:

Stick to the company logo and basic branding to up the visual appeal. But keep it balanced with the email signature text so that it doesn’t overwhelm the reader.
Add all essential information
Next, make sure your email signature has all your company and department’s essential information.
For example, include:
- Full name: Adding your full name helps personalize communication and ensures customers can access your support or department directly.
- Job title: Provides context on your role to ensure customers are talking to the right support department.
- Company name: This reinforces the company branding and fosters trust with customers when talking to a support agent.
- Contact information: Include a phone number and email address so that the customer can access support from your department without delay.
- Company website: Offers customers an easy way to access their account, learn more about your services, or access unique help desk instructions.
- Legal disclaimers: If needed, include a privacy disclaimer or confidentiality notice, especially if a department deals with sensitive information like banking information.
- Ticket information: Zoho Desk creates a unique ID for every new ticket. Add this information to help customers find their support agent and case.
Add useful links
Signatures are also great for directing customers toward other support channels and dedicated instructions.
Add links to your company’s knowledge base, FAQs, or support center. You can also link to other support channels like live chat, WhatsApp, or Zoho Desk ticket submission portals.
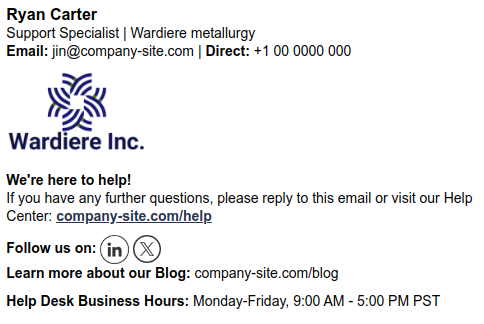
Example signature with useful links:


An email signature is also a chance to market your business’s social media accounts. Link to your organization’s social media account to encourage engagement.
This is also a key moment to link to review sites like Google My Business. Clients can share their experience with your customer support department, helping you build consumer trust and credibility.
Keep branding consistent
Consistent branding is crucial for building trust and credibility among customers, and building a strong business identity. This fosters customer loyalty—which is key to increasing customer retention.
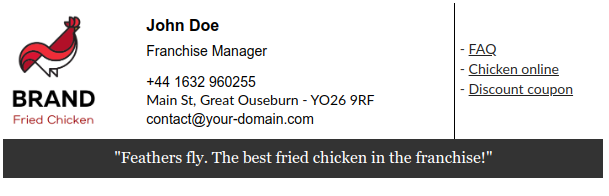
Example:

Not only do you pay 5 times less to acquire a repeat customer, but they also spend 31% more than new customers. It’s safe to say that repeat customers are the bread and butter of any successful business venture.
Ensure all email signatures align with your company’s visual identity by incorporating:
- The company logo
- Agent profile picture
- Brand colors and fonts
- A tagline or mission statement (if applicable)
Optimize the signature section for mobile devices
Mobile optimization is crucial, as 61,9% of emails are opened on mobile devices. If your email signature is not mobile-friendly, you risk losing the benefits of a good signature while also impacting email readability.
Example of a mobile signature with 320 widths:


Ensure your email signature is mobile-friendly by checking your signature and logo across multiple devices. Make sure that the signature section loads correctly and adjusts to the screen size and capabilities.
Also, check usability using different email providers, like Gmail, Outlook, Apple Mail, etc.
Zoho Desk email signature: How to setup manually
Zoho Desk lets you manually create a signature, which gives you much more creative freedom with the design and output. No matter your department or company, you can create an informative signature consistent with the company branding kit.
To create your email signature manually in Zoho Desk, follow these steps:
1. Log in to Zoho Desk
First, log in to your Zoho Desk account. You’ll need your unique company Zoho Desk login information to access the settings gear icon and create a signature from scratch.
2. Go to Zoho Desk signature settings
Once you’ve successfully logged into your Zoho Desk account, navigate to the top right corner of the dashboard.
Click the Settings gear icon in the top-right corner.
Under the Preferences section, select Signature.
3. Create a signature
Next, click on the Add Signature option. Choose the department where you want to apply a new email signature.
Use the HTML editor to compose your signature.
Add text, images, and links, format the fonts and colors to align with your branding, and click Insert on the HTML editor to add a logo.
Click Save to protect your progress as you go.
4. Save and deploy the new signature
Lastly, click Save to apply the custom signature to the selected department.
If you want the same signature for all departments, use the Save dropdown and confirm which departments you choose.
Again, click Save when you’re done choosing the applicable departments.
We also have a video covering how to update an individual HTML email signature on Zoho Desk.
Creating and managing signatures automatically for Zoho Desk
Using a powerful tool like Bybrand will help you create, manage, and deploy email signatures in Zoho Desk.
Full video:

Installation video of the Bybrand + Zoho Desk integration.
Using a powerful tool like Bybrand will help you create, manage, and deploy email signatures in Zoho Desk.
Deployment ensures that every outgoing email your support team sends includes a professional and consistent signature, the company logo, and all necessary business links.
Here’s how to use Bybrand for Zoho Desk to create and manage signatures automatically.
1. Sign in to Bybrand
Access your Bybrand account by logging in with your unique login credentials.
- Navigate to Integrations and select the Bybrand Zoho Desk integration.
- Enable the Zoho Desk integration to start the signature setup. Click Connect and authenticate your Zoho Desk account.
- Allow Bybrand the necessary account permissions to manage email signatures.
2. Verify agent and department settings
Next, import your Zoho Desk agents into Bybrand. This allows you to assign email signatures to multiple agents automatically.
Once you’ve imported all agents, verify the following:
- All agents have been imported into Bybrand.
- Departments in Zoho Desk are correctly assigned for signature application.
- You have the necessary permissions to manage agent settings.
3. Assign signatures to specific agents
Choose which agents or departments should receive the new signature.
- Navigate to your Bybrand account and then Zoho Desk Integration.
- Select an agent and use the HTML editor to select the appropriate email signature template, logo, and setup preferences.
- Click Apply to update the agent’s signature instantly.
4. Deploy signatures to multiple agents
You can assign signatures to multiple agents in one go.
- If you need to apply the same signature to multiple agents, select Bulk Assign.
- Choose the relevant agents on the account and click Save to confirm the deployment.
- All assigned agents will receive the updated signature in their Zoho Desk settings.
5. Enable department-wide signatures
If you prefer department-wide uniformity:
- Select the department settings in Zoho Desk.
- Choose the default signature template for all agents in the department.
- Apply the signature, ensuring that all emails from the logo and branding stay consistent, and click Save.
6. Test and verify signatures
Make sure the signature looks good and verify all the signature information with a test.
- Send a test email from an agent’s Zoho Desk account to check formatting.
- Ensure that the signature appears correctly on desktop and mobile email clients.
- Note that if you need to make any adjustments, edit the template in Bybrand, click Save, and redeploy it.
7. Maintain and update signatures regularly
You don’t want customers to see information that was relevant months ago but not today. Whenever company details change, update the master template in Bybrand and remember to click Save. This lets you modify all signatures without requiring individual updates.
To keep email signatures up to date:
- Schedule quarterly reviews to update branding elements, disclaimers, or company links.
- Use Bybrand’s bulk update feature to apply changes across all agents without manual edits.
Conclusion
Email signatures in Zoho Desk enhance your company’s professionalism and ensure consistent branding across all customer interactions.
Whether you add signatures manually or leverage Bybrand, maintaining clear, informative, and visually appealing signatures is crucial for effective customer communication.


Create your first email signature with Bybrand
Bybrand offers the ability to generate, administer, and distribute essential email signatures for your employees.