

This post is also available in: Português
Migrating from one email signature manager to another can be a huge task. We want to help alleviate some of the work that you will have to put into changing from WiseStamp to Bybrand. With that goal in mind, we have created a guide with 5 steps detailing some main differences between Bybrand and WiseStamp, as well as some useful tips.
Furthermore, as you go through these steps, you will notice that it is possible to create and implement modern HTML email signatures for all Gmail for Business users in only a few minutes.
But before we start listing the steps for migration, let’s answer an important question.
Why migrate from WiseStamp to Bybrand?
That is the main question that you must ask yourself when you are thinking of establishing an alternative email signature manager to WiseStamp. Not all email signature managers are the same. So here are some important differences that you should consider when moving from WiseStamp to Bybrand:
Email signature editor in HTML
Bybrand has an advanced HTML editor, which allows text and image content to be added to any part of your email signature. This is different from WiseStamp, where you need to fill out fixed fields in forms.

Template gallery
40+ professional templates to get you started fast, as well as support for editing in HTML mode for specialists.
Integration with Google Workspace
The integration was built with love for companies that use Google Workspace. We offer the largest number of native Google Workspace features among all of our competitors.
Unlike working alone, collaborating with colleagues can be a fantastic way to generate better ideas for email signatures. Bybrand’s Team resources allow you to invite members of your team to help you with management.
Additional integrations
Bybrand has secondary integrations, such as Bitly, Freshdesk, and Zoho. With this, we are more deeply focused on speed and saving time by avoiding repetitive tasks and switching between navigation tabs.
Now that you know the main characteristics of Bybrand in relation to WiseStamp, it’d be no surprise if you started thinking about all of the benefits that Bybrand could bring to your company.
The right tool guarantees that your email communication will be efficient.
On that note, you are probably already convinced that Bybrand is the best solution, especially because your goal is to save time and increase flexibility.
Let’s start the migration.
Starting the migration
Migrating is easy with the following five steps. We have created an illustration to better demonstrate the process. Before we start, you must be a Super-Admin of Google Workspace, or that you have someone on your team with access.
An important factor when you are planning your strategy for migrating to Bybrand is how much inactive time there will be during the transition. Your employees can’t stop sending emails. Bybrand connects to Google’s API directly and, therefore, the transition is smooth, with no interference to the messages sent.
Initial requisites
- A Super-Admin account in Google Workspace;
- WiseStamp email signatures (optional);
- A Bybrand account;
Let’s discuss these 5 steps in detail and consider that you already have a Bybrand account. This can be an account within the trial period.
Check out the 5 steps for a smooth transition from an alternative solution for the email signature management to Bybrand.
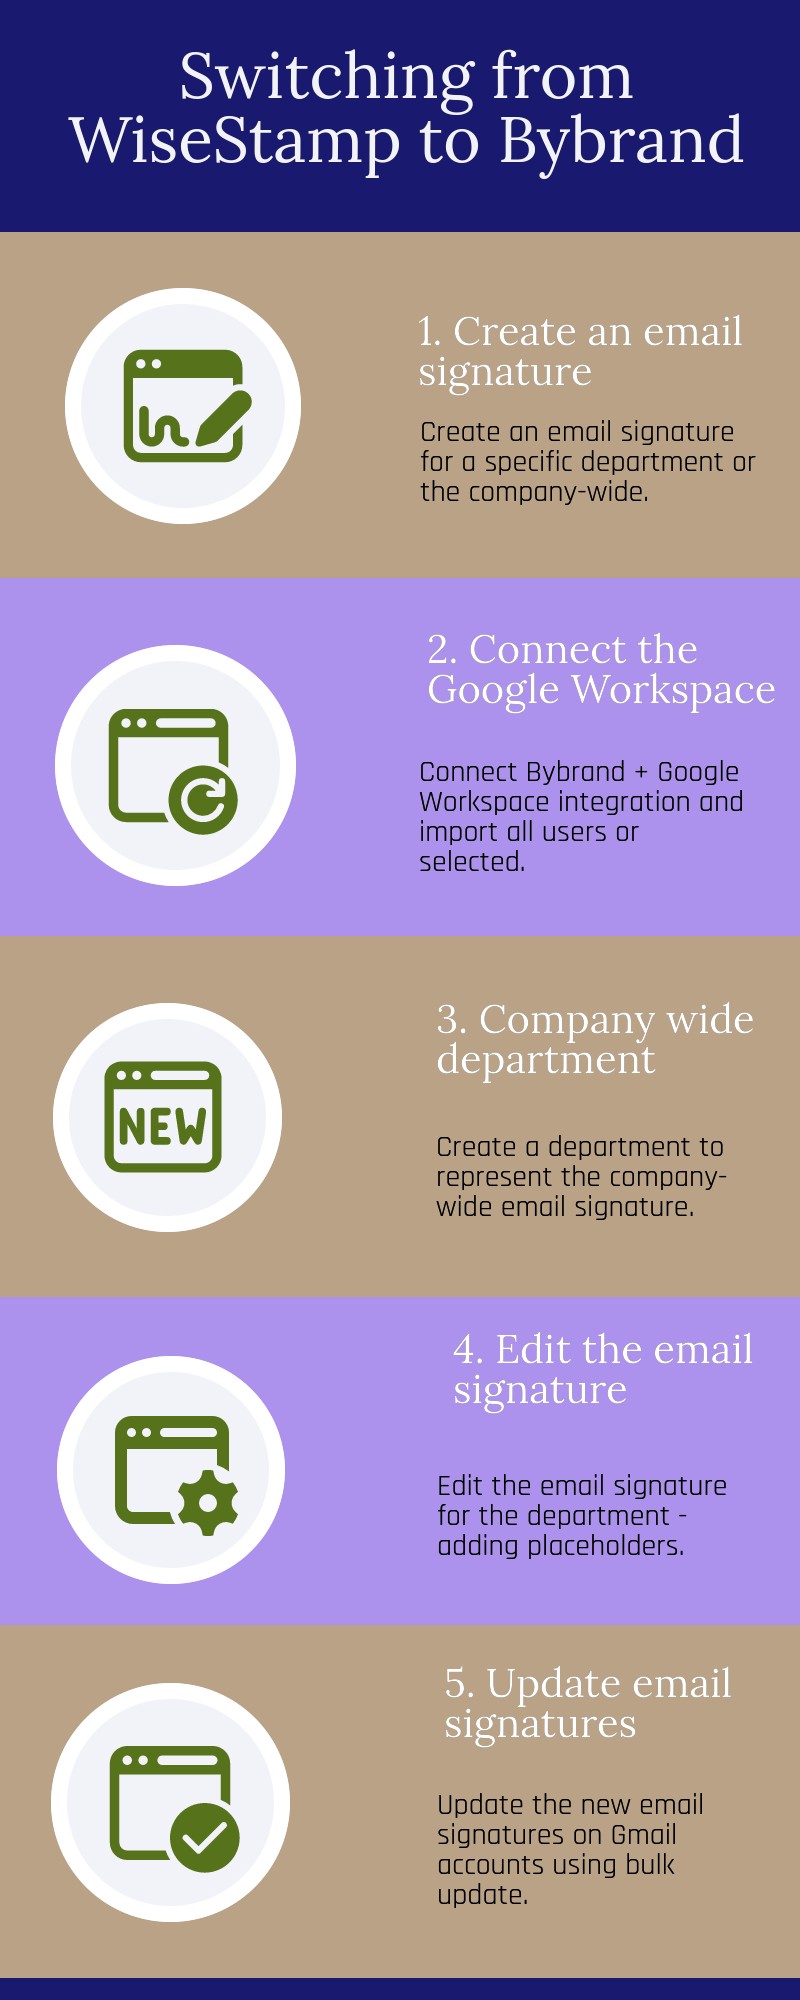
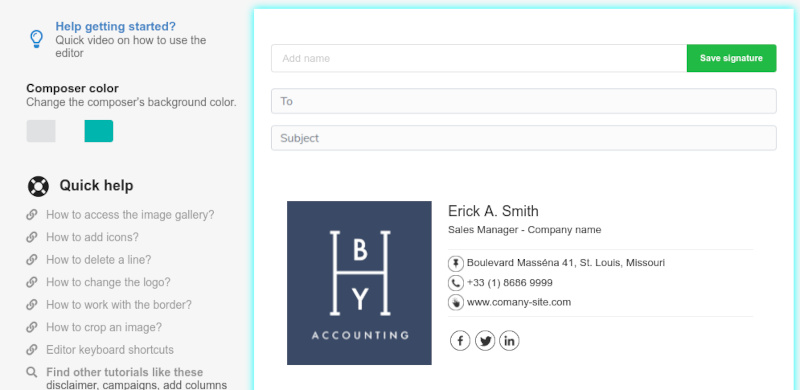
1. Creating an email signature
The first step is to create a signature for either the company or a specific department, such as Sales or Marketing. To make it easier for you to understand, let’s create a standard signature for the entire company.
If you already have an email signature at WiseStamp, you can create a similar one using Bybrand’s HTML editor.
Visit the menu Signatures – Create signature.


Once you do this, you will be redirected to the template page. Choose a model and start adding your company’s standard information, such as the logo, website, and social media icons.
Notice that the standard information does not change for different employees.
For our example, I started with this mode. Save the signature and then let’s move on to the next step.

2. Add the Bybrand + Google Workspace integration
Now you need to add the Google Workspace integration with Bybrand in two steps.
First, go to the integration with Google Workspace on the menu Account – Integrations. Then add your Super-Admin email and the domain of your corporate email address.

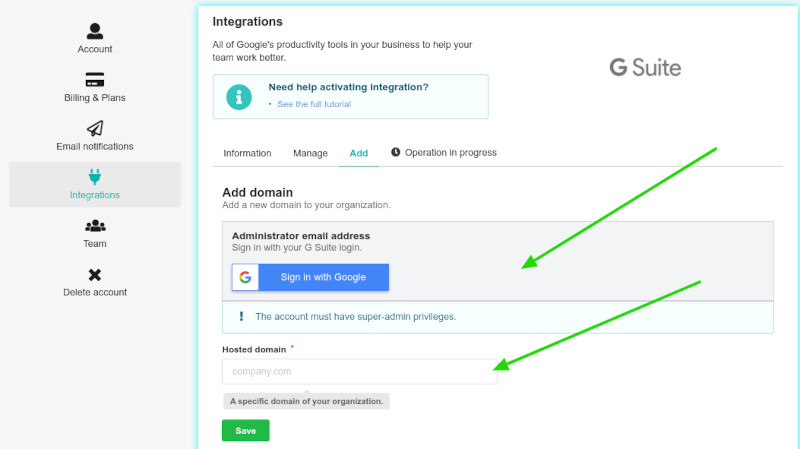
After this, you need to authorize Bybrand’s APP at Google Workspace Marketplace. Log in as Super Administrator and add the APP to your account.
Here we have a video tutorial on the necessary steps to add Bybrand’s APP to Google Workspace Marketplace.
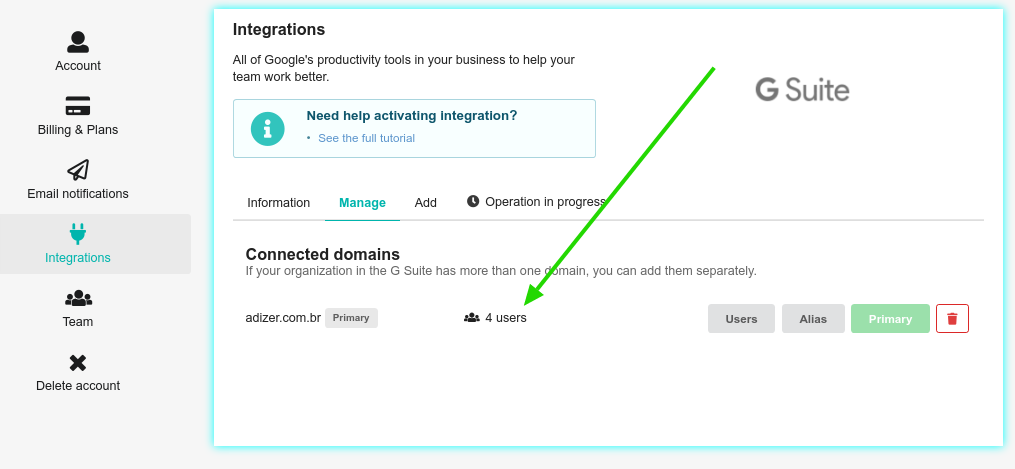
To finalize this, try to load the users by clicking on the button Users. If there is a number, like in our example below, the integration has been successfully activated. Congratulations!

3. Create a department
The third step is to create a department to represent the email signature of the company.
Visit the menu Departments, and then click on Create department.
Give the department a name. After this, import users through the Google Workspace (previously G Suite) integration.
Here is an example:

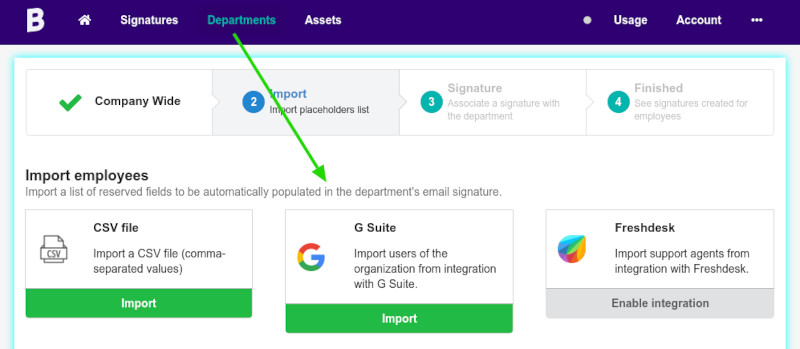
Import all users to the department. Select everyone and then click on the button Import selected.


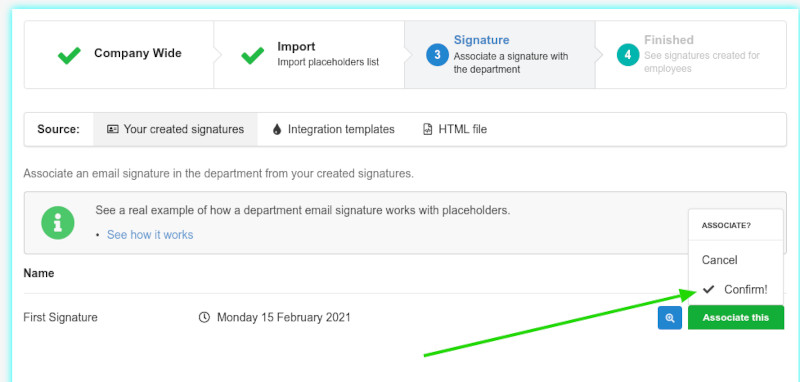
In the next step, we will connect the email signature that was created in the first step to this new department.
Here it is. Click on Associate, like in the example below.

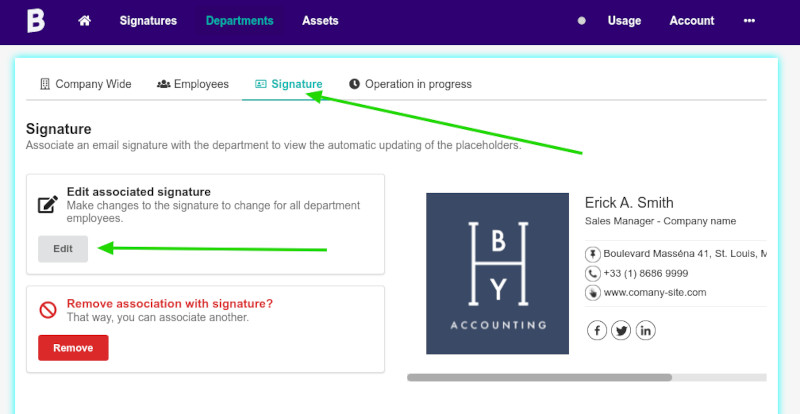
All the steps have been completed. Click to see your employees’ email signatures.
You will notice that the email signatures do not change with each employee integration. At this point, this is normal because we haven’t added the reserved spaces of the integration yet.
Let’s do that in the signature editing section, which is the next part.
4. Edit the email signature
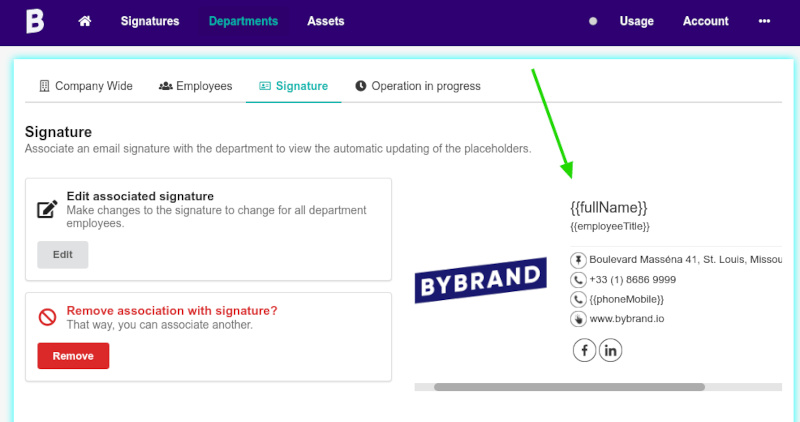
In the fourth step, we need to edit the email signature and add the placeholders of the integration.
In the department created, visit the menu Signature. And, after this, click on Edit signature.

Now let’s add the placeholders of the department to places where the integration exists for each user. This means each user’s personal information.
In our example below, we added the placeholders for fullName, employeeTitle, and phoneMobile.

Once you have finished making changes, save the email signature. Then go back to the department.
Here we have an example of the result of our edited email signature:

You will notice that now the reserved fields change to show the employee’s real information.
Click on the menu Employees to see the integrations.
5. Update the email signatures
The fifth step is the last one, and it is where we will update the new email signatures in each user’s account.
As soon as your new email signatures are ready to be updated, you must send an internal notification about when the migration will occur to avoid surprises. This can be done by email or through an internal messaging system.
For greater convenience, Bybrand has the ability to Bulk Update, which will save you a lot of time.
Click on the menu Employees, and then on the option Bulk Update.

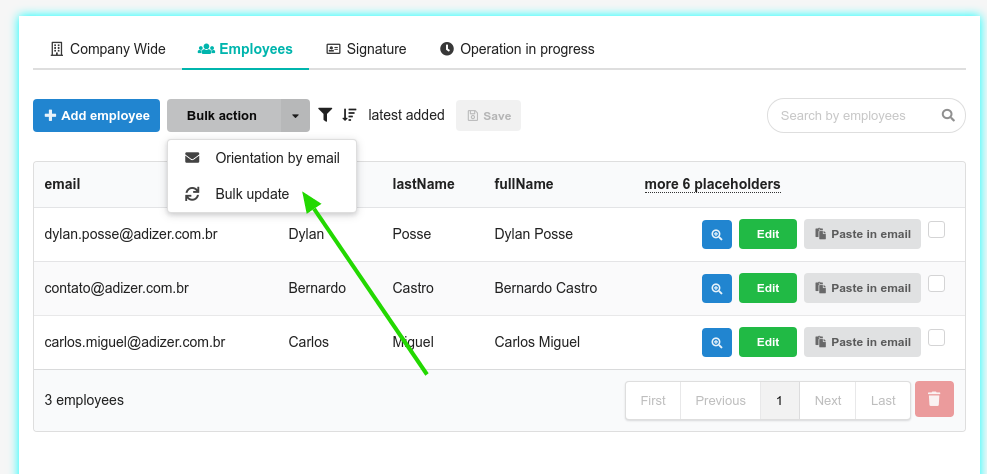
On the page that opens up, you can select a group of employees or update everyone’s email signature.

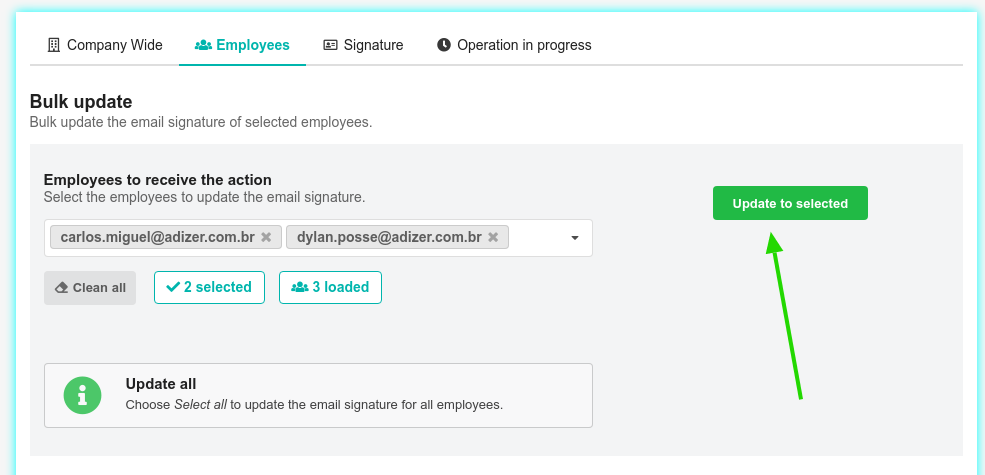
When you click the button, all the email signatures will be updated on each user’s Gmail account, and the next email sent will have the updated and modern email signature.
When you complete these 5 steps, you’ll realize that the migration to a new and improved email signature manager is a pretty easy process. Now you are free from the frustrating stages you faced when first using WiseStamp.
Conclusion
Bybrand is a project with a vision of integration with third-party tools in mind. WiseStamp, on the other hand, was created to build simple email signatures that depend on manual actions.
Related: How Bybrand is the better alternative to WiseStamp?
When you use Bybrand to manage email signatures, you will obtain benefits from simplifying the process to reducing the implementation process.
We want to guarantee that you will be completely satisfied and able to implement the email signatures before buying the software. Because of this, we offer you instant, full access to Bybrand for 30 days for free.


Create your first email signature with Bybrand
Bybrand offers the ability to generate, administer, and distribute essential email signatures for your employees.