

This post is also available in:
Email signatures are one of those things every company says they’ll sort out properly, and very few actually do. Someone updates the logo, a rebrand goes out, half the team gets the memo and updates their Outlook email signature, the other half doesn’t.
Or worse, people just freestyle it entirely. Different fonts, random colors, phone numbers that go to a desk phone nobody answers anymore. Multiply that across 50 or 100 employees, and every outgoing email starts to feel a little… off.
There’s always that one person whose signature still has the old office address. And another whose font is somehow Comic Sans adjacent. Asking a 60-person team to individually manage their own Microsoft 365 email signatures and keep them current is, to put it generously, optimistic. One central setup means it’s handled from the top down, and nobody has to remember to do anything.
Bybrand’s Outlook Add-in sorts all of this out, and it’s a lot more straightforward than you’d expect.
Step 1 – Export and prepare your Microsoft 365 user list
Start in the Microsoft 365 Admin Center. Export your user list and download the CSV file to your computer.

Open it up in Excel or whatever you’re comfortable with. The single most important thing to get right at this stage is identifying the email address column because that’s the field Bybrand uses to match each person to their Outlook email signature. Get that wrong, and things won’t connect properly.
While you’re in there, clean the file up. Pull out empty columns, remove fields you’re not going to use, and delete any rows for users you don’t want in the rollout. Contractors, people on leave, former employees who somehow still appear in the list. The cleaner the CSV going in, the smoother everything runs.
Save it when you’re done.
Step 1 checklist
- Log into Microsoft 365 Admin Center
- Export the user list and download the CSV
- Open the CSV in Excel or Google Sheets
- Identify the email address column
- Remove unused columns, empty rows, and unwanted users
- Save the cleaned file
Step 2 – Create the signature in Bybrand and import your users
Head into Bybrand and create a new email signature. If you’re starting from scratch, the pre-created templates are a solid jumping-off point. Pick one that works for your brand, give it a name, and save it.
Then go to the Automation area. This is where the CSV comes in. Create a new group, import the file, and in the signature step, select the template you just set up.
At this point, the signature is still static, meaning everyone would get the same thing. To make it actually personalized per employee, you need to add placeholders to the HTML. Bybrand pulls these directly from your CSV columns and lists them at the bottom of the signature editor, ready to drop in.
Email signature example with placeholders for Microsoft 365 users.

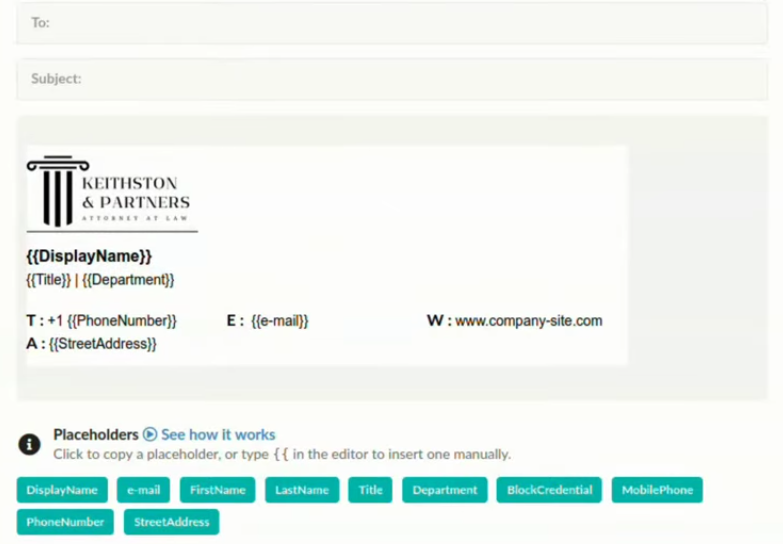
Go into the HTML and place each one where it belongs. Display name, job title, phone number, whatever fields you’ve got in the file. Hit save, and Bybrand automatically generates a unique Microsoft 365 email signature for every single employee you imported.
Step 2 checklist:
- Log into Bybrand and create a new email signature
- Choose a pre-built template and save it with a name
- Go to the Automation area and create a new group
- Import the CSV file and select your signature template
- Open the HTML editor and insert placeholders (display name, job title, phone number, etc.)
- Save changes and verify each employee has a personalized signature generated
Step 3 – How to make a signature block in Outlook using the Bybrand add-in
Signatures are ready. Now they need to actually show up in Outlook.
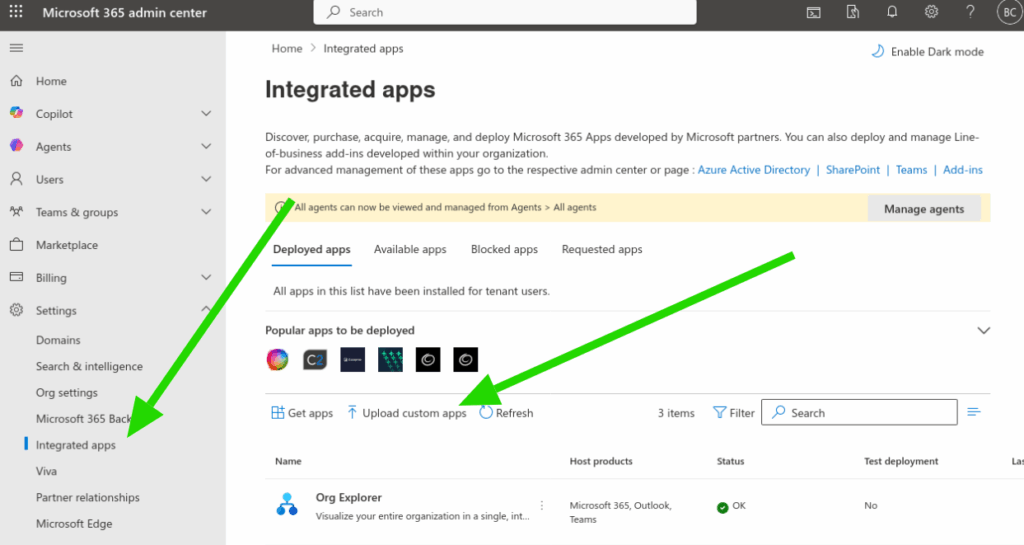
In Bybrand, go to the integrations menu and click on Outlook Add-in. Enable it, then download the manifest.xml file to your computer.

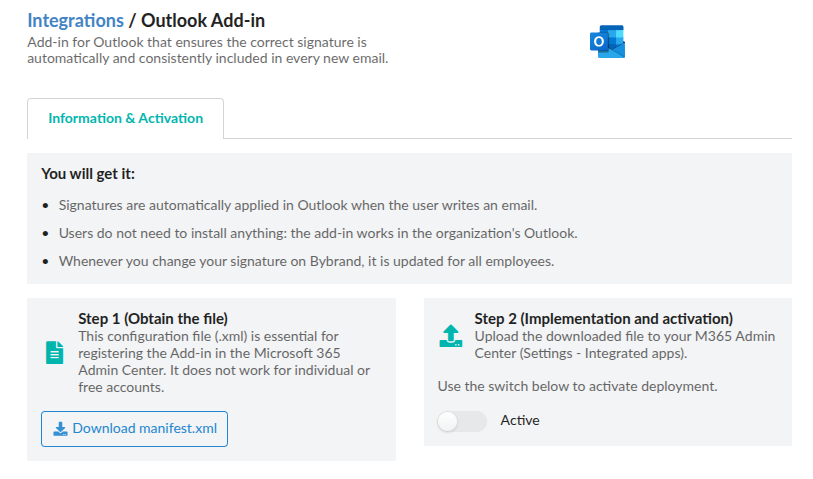
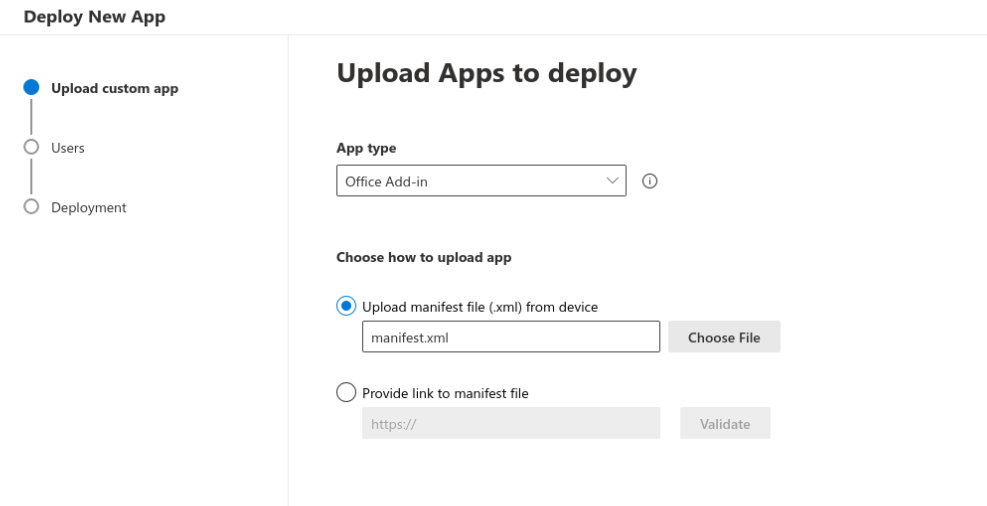
Take that manifest file back to the Microsoft 365 Admin Center and use it to deploy the add-in across your organization. You do this once, and it pushes out to every user automatically. Nobody on the team needs to download or install anything on their end, which, honestly, is the part IT admins appreciate most.

After that, it’s done. When any employee opens Outlook and starts a new email, their personalized Outlook email signature is already sitting in the message body. And if they have access to more than one signature, say a standard version and one tied to a current campaign, they can open the Bybrand panel right inside Outlook and swap between them with one click.
Step 3 checklist:
- Go to the integrations menu in Bybrand and select Outlook Add-in
- Enable the integration and download the manifest.xml file
- Log into the Microsoft 365 Admin Center
- Deploy the add-in organization-wide using the manifest file
- Confirm the add-in appears in Outlook for users
- Test by opening a new email and verifying the signature loads automatically
Why the built-in Microsoft 365 option isn’t quite enough
Microsoft 365 does have something called transport rules that can add organization-wide signatures in Microsoft 365 at the server level. It sounds good on paper. In practice it has a few annoying limitations.
The biggest one is that server-side signatures don’t show up in the compose window. So when your employee is writing the email, they can’t actually see the signature that’s going to get appended.
HTML rendering through transport rules can also get messy, and there’s very little flexibility if different teams need different signature versions.
With Bybrand, what the employee sees in the compose window is exactly what lands in the recipient’s inbox. Proper HTML, fully branded, no rendering surprises. When updates need to happen, a title change, a new campaign banner, one of those last-minute legal disclaimers that compliance drops on you, one person makes the change in Bybrand and it’s done across the board.
No reply-all. No tickets. Nobody’s still running the old version three weeks later because they missed the email.
Bybrand’s full documentation on the Outlook Add-in covers the Outlook email signature management side in detail if you want to go deeper on the admin setup.
Who actually benefits from setting this up
The short answer? Pretty much every team that sends external emails regularly. But some feel the difference more acutely than others.
Sales teams are the obvious one. High email volume, client-facing conversations, and a brand reputation on the line with every message. A mismatched Microsoft 365 email signature in front of a prospect isn’t career-ending, but it doesn’t help.
Support teams run into similar issues, especially where turnover is high and new starters sometimes go weeks without a proper signature set up.
IT teams are probably the quiet winners here. Anyone who’s worked a help desk knows how many tickets come in around Outlook email signature management. Centralizing this through proper generated mail signatures for Microsoft 365 tooling removes the whole thing from the queue altogether.
The bottom line
Most people who’ve tried to generate mail signatures for Microsoft 365 users manually know how quickly it becomes a rabbit hole. The settings are there, the options exist, but scaling it across a full organization through native Microsoft tools alone gets complicated fast.
The process covered here—pulling your user list from Microsoft 365, running it through Bybrand’s automation, adding the dynamic placeholders, and pushing the add-in out via manifest—is genuinely a one-time setup.
After that, it runs itself. New hires get their automatic email signatures in Microsoft 365 from day one. Campaigns update across the complete company in minutes. And organization-wide signatures in Microsoft 365 stay consistent without anyone having to chase a single person.
For the full walkthrough, including CSV configuration and dynamic field setup, Bybrand’s documentation page has everything laid out step by step.
If you’re more of a visual learner, we put together a full video tutorial walkthrough right here.


Create your first email signature with Bybrand
Bybrand offers the ability to generate, administer, and distribute essential email signatures for your employees.